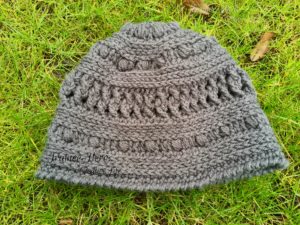
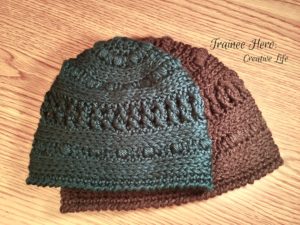
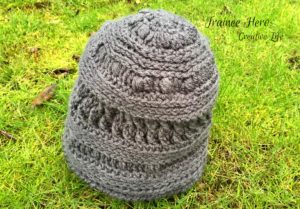
I’ve made several hats in the past six months. In fact, I added it up and I’ve made 16 hats since September 15. But a woman can never have make too many hats. While looking at Pinterest, I convinced myself I needed to make a textured crochet hat. I wanted one with some braid-looking rows and maybe some puff stitches! After playing around with post stitches and increases, I made this: the Winter Picnic Hat! Eating and BBQing outdoors in the winter requires proper attire. Hence the winter picnic hat! I’m excited to share this free crochet pattern in two sizes!
Constructing the Winter Picnic Hat
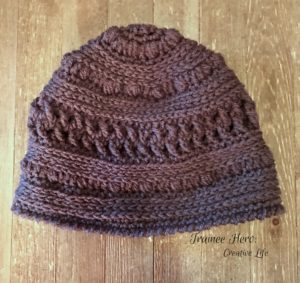
Who knew that you could crochet a hat in so many different ways! Because of that, I thought I’d share a few notes about constructing this textured crochet hat. First, you make the winter picnic hat top to bottom. I use fairly typical increases for crocheting in the round. When making a round crochet object, one needs to add stitches to each round to prevent the object from turning into a tube. When you add a certain number of stitches to each round, the circle will stay flat. Of course, a hat should not end up a flat circle, so at some point we stop increasing to form the sides of the hat.
Additionally, this hat starts with fewer stitches in the first round than the number that forms a flat circle. Instead, we start with a slightly domed circle. Some hats begin with a flat top and others begin with a domed top. A flat circle needs to start with 12 double crochet stitches in round 1. This hat begins with 8 double crochet stitches. Crochet has formulas for things like this! When I forget the formulas, I look them up in my copy of the Crochet Answer Book by Edie Eckman.
Finally, because this hat begins with 8 double crochet stitches, that means we add 8 stitches per round. The number of stitches you start with usually determines the number of stitches you increase by in each row. Not only did I not want a flat top to this hat, I felt that increasing by 12 stitches each round gave me less flexibility on sizing the hat. Beginning with 8 stitches was just right!
Keeping a Straight Seam
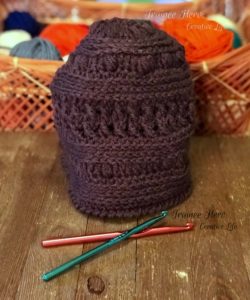
I also want to keep the seam on the hat straight. To do this, instead of adding your stitches at the beginning of the round, do your 1:1 stitches first and then do your extra stitch. For example, in round 4 of the winter picnic hat, you crochet one hdc in each of the first two stitches, then two hdc in the next stitch. The times when you increase by crocheting two stitches into one are kept for the end of that set of stitches. Instead of the seam of each round staggering to the right, it will end in the same place each round for a straight seam.
Free Crochet Pattern for the Winter Picnic Hat
Pattern Notes
Materials and terms
This pattern uses U.S. crochet terms.
The yarn I used for this textured crochet hat is Red Heart Super Saver in Charcoal. I used about 1/3 of the 7 oz. skein.
I used an aluminum hook in size H.
Stitches
Some of the stitches and techniques , so I have made a few notes about them!
Magic Ring:
Puff stitch: Yarn over, insert hook into stitch, pull up a loop. Yarn over again and insert hook in the same place and pull up a loop. Yarn over a third time, insert hook in same place and pull up a loop. Yarn over a fourth time, insert hook in same place and pull up a loop. Yarn over and pull through all loops on hook.
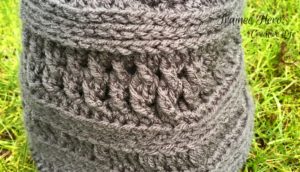
Working in the third loop of hdc. I love this technique! Tamara Kelly at Moogly Blog has an excellent tutorial on how to crochet in the third loop of an hdc. If you haven’t done this before, check out her tutorial. (And then come back and make the Winter Picnic Hat!) The horizontal rows of knit-looking stitches on this textured crochet hat are made with this technique.
Crab stitch: Crab stitch is literally doing a single crochet backward. You crochet to your right instead of to your left (for right handed crocheters). It seems weird for the first couple stitches, and then it clicks! Ashlea at Heart Hook Home has a great tutorial.
Round 7
Round 7 is a little tricky. The round contains puff stitch, 3 dc, puff stitch all the way around. You work all of those stitches in the third loop of the hdc row below it. Not too complicated. But we need increases in this round, too. Basically, you’re doing 5 stitches, then two stitches in one place, then five stitches, then two stitches in one place around to the end. Sometimes that’s two dc. Sometimes a puff stitch and a dc and sometimes a dc and a puff stitch. The instructions for round 7 spell out every stitch you need to make. Because the round contains 56 stitches, you’ll want to count carefully to follow along with those instructions. Alternatively, you could keep this explanation in mind.
Pattern Instructions
Adult size
Begin by making a Magic Ring.
Round 1: Make 8 dc in magic ring. Join with a slip stitch to first dc. (8 dc)
Round 2: Chain 1 (does not count as first sc). 2 sc in each dc. Join with a slip stitch to first sc. (16 sc)
Round 3: Chain 2 (does not count as first stitch). Puff stitch in first sc, 2 dc in next sc. *Puff stitch in next sc, 2 dc in next sc. Repeat from * around to end. Join with slip stitch to first puff stitch. (24 stitches [8 puff stitches and 16 dc])
Round 4: Chain 1 (does not count as first hdc). *1 hdc in each of first two stitches, 2 hdc in next stitch. Repeat from * around to end. Join with slip stitch to first hdc. (32 hdc)
Round 5: Chain 1 (does not count as first hdc). All stitches for this round are worked in the third loop. *1 hdc in each of the first three stitches, 2 hdc in the next stitch. Repeat from * around to end. Join with a slip stitch to first hdc. (40 hdc)
Round 6: Chain 1 (does not count as first hdc). All stitches for this round are worked in the third loop. *1 hdc in each of the first 4 stitches, 2 hdc in next stitch. Repeat from * around to end. Join with a slip stitch to first hdc. (48 hdc)
Round 7: (see pattern notes about this round) Chain 2 (does not count as first stitch). All stitches for this round are worked in the third loop. Puff stitch in the first hdc. 1 dc in each of the next 3 hdc stitches. Puff stitch in the next hdc. 2 dc in the next hdc. 1 dc in next hdc. Puff stitch in next hdc. 1 dc in each of the next 3 hdc stitches. Puff stitch and 1 dc in the next hdc. 1 dc in each of the next 2 hdc stitches. Puff stitch in the next hdc. 1 dc in each of the next 2 hdc stitches. 1 dc and puff stitch in the next hdc. (21 stitches made at this point.) 1 dc in each of the next 3 hdc stitches. Puff stitch in the next hdc. One dc in next hdc. 2 dc in the next hdc. Puff stitch in the next hdc. 1 dc in each of the next 3 hdc stitches. Puff stitch in the next hdc. (33 stitches made at this point.) 2 dc in next hdc. dc in next hdc. Puff stitch in next hdc. 1 dc in each of the next 3 hdc. Puff stitch and dc in next hdc. 1 dc in each of next 2 hdc stitches. Puff stitch in next hdc. 1 dc in each of the next 2 hdc stitches. 1 dc and a puff stitch in next hdc. 1 dc in each of the next 3 hdc stitches. Puff stitch in the next hdc. 1 dc in the next hdc. 2 dc in last hdc. (56 stitches)
Round 8: Chain 1 (does not count as first hdc). 1 hdc in each of the first 6 stitches. Then make 2 hdc in the next stitch. *1 hdc in each of the next 6 stitches. 2 hdc in the next stitch. Repeat from * around to end. Join with a slip stitch to first hdc. (64 stitches)
Round 9: Chain 1 (does not count as first hdc). Working in the third loop for each stitch, 1 hdc in each stitch around to the end. Join with a slip stitch to first hdc. (64 hdc)
Round 10: Repeat Round 9. (64 hdc)
Round 11: Chain 2 (does not count as first dc). Working in the third loop for each stitch, 1 dc in each hdc around to the end. Join with a slip stitch to the first dc. (64 dc).
Round 12: Chain 2 (does not count as first stitch). Fptr in 2nd dc, fptr in 1st dc. (You make an x.) Fptr in 4th dc, fptr in 3rd dc. Continue making the x’s around to the end. Join in top of first fptr with a slip stitch. (64 fptr stitches, 32 x’s)
Round 13: Chain 2 (does not count as first stitch). Fptr in 2nd fptr below, fptr in 1st fptr in row below. (You make an x.) Fptr in 4th fptr, fptr in third fptr. Continue making the x’s around to the end. Join in top of first fptr with a slip stitch. (64 fptr, 32 x’s)
Round 14: Chain 1 (does not count as first stitch). Hdc in each stitch around to end. Join with a slip stitch to the first hdc. (64 hdc)
Round 15: Chain 1 (does not count as first stitch). Working in the third loop for each stitch, 1 hdc in each stitch around to the end. Join with a slip stitch to first hdc. (64 hdc)
Round 16: Repeat round 15.
Round 17: Chain 2 (does not count as first stitch). Work in the third loop for all stitches this round. *Make a puff stitch in the first hdc. 1 dc in each of the next hdc. 1 puff stitch in next hdc. Repeat from * around to end. Join with slip stitch to top of first puff stitch. (64 stitches)
Round 18-20: Repeat rounds 14-16.
Round 21. Chain 1 (does not count as first sc). Working in the third loop, 1 sc in each hdc around to end. Join with a slip stitch to the first sc. (64 sc).
Round 22: Chain 1 (does not count as first sc). 1 sc in each sc around to end. Join with a slip stitch to first sc.
Round 23: Chain 1. Crab stitch in each sc around to end. Slip stitch to chain 1. Finish off and weave in ends.
Child size
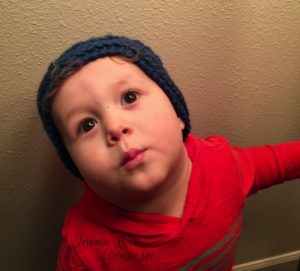
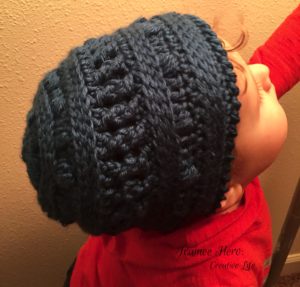
For the child size hat, I used Caron Simply Soft in Ocean.
The first 7 rounds of the pattern are the same as the adult size.
Round 8: Chain 1 (does not count as first hdc). 1 hdc in each stitch round to end. Join with a slip stitch to first hdc. (56 hdc.)
And now Rows 9-23 are the same as the adult size, but end with 56 stitches instead of 64. The child size hat is a little slouchier, as it has the same length as the adult size, but for a smaller head.
I precisely had to appreciate you all over again. I am not sure the things that I might have gone through in the absence of the entire methods documented by you directly on such industry. It had become a real fearsome crisis in my circumstances, however , finding out the skilled manner you managed that made me to jump over fulfillment. I am happier for this help and even hope you find out what a great job you are doing instructing other individuals through the use of your blog post. I know that you have never encountered all of us.
Today, I went to the beach with my kids. I found a sea shell and gave it to my 4 year old
daughter and said “You can hear the ocean if you put this to your ear.” She placed the
shell to her ear and screamed. There was a hermit
crab inside and it pinched her ear. She never wants to go back!
LoL I know this is totally off topic but I had
to tell someone!
Thank you for the auspicious writeup. It in fact was a amusement account it.
Look advanced to far added agreeable from you! By the
way, how could we communicate?