
I love almost everything about dyeing yarn with Kool-Aid: The ease of finding Kool-Aid, the price, the smell, the novelty, the colors, the fun. On the other hand, I cannot accurately predict the outcome and I’m struggling to get dark red to stay in the yarn. I’m happy with the effects I achieved with dyeing the yarn this time, but I’m not entirely sure that the color will not bleed if the yarn gets wet. Today, I will share how to Kool-Aid dye silk yarn. I’ll share tips and cautions I discovered through trial and error (so many errors). Even if the results aren’t perfect, dyeing with Kool-Aid is still inexpensive and fun!

Along with tips and cautions, this post will review the process for Kool-Aid dyeing silk yarn in 5 steps. We will discuss how to prepare the yarn and how to prepare the dye. Then I will share my own initial attempts at dyeing the yarn and setting the dye. Finally, we will get into how to rinse the extra dye away and look at a bunch of dyeing don’ts. But first, let’s look at what supplies you’ll need.
Supplies for Kool-Aid dyeing silk yarn
You will need:
- Kool-Aid (Do not use the sweetened kind. make sure it’s the tiny packets you have to add sugar to, not the bigger packets full of sweetener already.)
- Protein fiber yarn (This will only work on yarn with protein fibers like wool, silk, cashmere, soy silk, etc. It will not work on plant fibers like cotton or linen and will not work on most human-made fibers like acrylic. This tutorial is for silk, which will not felt like some wools. If you are using wool, be careful not to agitate the wool when heating up the wet yarn so it will not felt.)
- Sink and water
- Microwave-safe glass dish
- Microwave oven
- Pot holders
- Steamer (I use a vegetable steaming appliance, but a vegetable steaming insert for a pot will work, too.)
- Tissue paper
- Plastic wrap
- Towel you don’t mind staining
- Rubber gloves (if you don’t want to stain your hands)
1. How to prepare your yarn for Kool-Aid dyeing

Wind your yarn into loose hanks
You need your yarn to be loose enough for the dye to get at all the fibers, but still manageable. This means you need to wind it into loose hanks. As I mentioned in my post about unraveling yarn from sweaters, I wound this yarn around a DVD case to get the hanks the size I wanted. The hanks varied in size, as yarn breakage or the end of a sweater section usually dictated when I would start a new hank. Make sure that you can put your fingers around the hank and that the yarn bunch is not bigger around than a quarter coin. (I’m using very fine silk thread. That is many many many strands in a hank as big around as a quarter. If your yarn is bulkier, you can probably wind slightly larger hanks.)
Before dyeing your hanks of yarn, you’ll want to soak them. I have done this without soaking the yarn first. It definitely works much better to soak the yarn for at least 30 minutes before sticking it in the dye. What worked easiest for me was to put the yarn in a glass or a jar full of water and leave it there while I worked on other things or overnight. The yarn will be good and soaked when you pull it out of the water. If you have recovered this yarn from a sweater or if the yarn has been treated with any kind of coating, washing it with some gentle soap would’t hurt. I just used dish soap. This removes some of the coating or sizing that might be on the fibers and makes them more ready to accept dye.
How to prepare your Kool-Aid dye for the yarn
For this step, I put some water in a glass pyrex baking dish and added a glug of vinegar. I think the vinegar is not technically necessary, as the Kool-Aid already contains citric acid, but it isn’t going to hurt anything. Now it is time to add the Kool-Aid packets. Somewhere around 2-3 packets for each hank of yarn should be plenty. Make sure you do not add sugar. While this might make your dye taste better, you aren’t drinking it, so that’s not really a consideration. It will make a sticky mess, though, and that IS a consideration.
The amount of dye you use depends on the amount of yarn you use, not the amount of water. The yarn soaks up the dye, not the water (especially if it is already wet). Once the powder is dissolved, go ahead and add your yarn. I love this part! It is so cool to see what the colors do to the yarn.
Variation: If you are wanting to achieve some hand-painted effects, you can put your yarn in the dish before adding water and dye. Go ahead and sprinkle the powder directly onto the yarn. Or mix the Kool-Aid with a small amount of water and drizzle it onto the yarn with a spoon or from a squirt bottle. I added powder directly to the yarn for a couple of the hanks. After adding your powder and turning the yarn over to do the other side of the hank, gently add some water to the dish. Do not stir. (Food coloring is also a fun thing to add directly to the yarn if you are so inclined.)

How to Kool-Aid Dye Your Yarn
Place your microwave-safe glass dish into the microwave and microwave on high for 1 minute. Let the yarn sit for 1-2 minutes after microwaving it. Do this again 4-5 more times. The idea here is to let the heat open up the fibers so that the color can bond with the fibers. You don’t want the silk to get too hot, which is why you let it sit for 1-2 minutes between each time you zap it. If you are using wool yarn, this is the part where you want to be very careful. Make sure you do not agitate the wool at all or it will felt.
Using pot holders, remove the microwave-safe dish from the microwave and set aside. (Or leave it in there if you don’t need to use the microwave.) Let the yarn and dye cool. When the yarn and dye bath is cool, dump it into a colander. Rinse the yarn gently with cold water. This step allows you to remove a bit of the excess dye that isn’t binding with the fibers. When the water runs clear or at least close to clear, squeeze out the water and put on a towel (the one you don’t mind staining) and pat excess water out.
How to steam set your Kool-Aid dye in the yarn
Let me be honest here: I don’t really know if this step does anything over and above using the microwave to dye the yarn. Heat is necessary at some point to make sure the fibers and the dye bind together, but I don’t actually know if one needs the heat to both dye and set the dye afterward. If anyone knows this for sure, please let me know in the comments. I did this to be extra safe and because I read that when dyeing playsilks with Kool-Aid, they should be steamed.
Take your patted-damp yarn and wrap the yarn in a layer of tissue paper. Wrap that tissue paper package in plastic wrap. Wrap it in plastic wrap again once or twice more. You want to make sure that no water from the steamer can sneak into the packet and get onto the yarn. Wrapping it two or three separate times helps make sure the condensation stays off the yarn. Wrap that plastic parcel in tissue paper. Place your wrapped yarn packages into the steamer and steam for 2-3 hours, making sure that the yarn is not getting into the steaming water. Add water to your steamer as necessary to keep it going for 2-3 hours.
Rinsing away excess dye
When your steaming is done, carefully remove the packages from the steamer (maybe with a potholder or with tongs) and let cool. When the packets are cool, open them carefully. If the yarn is still a bit warm, let it cool off a bit more. When the yarn has cooled, add a bit of mild soap or a few drops of synthrapol and wash the yarn gently. Rinse the suds out in cold water and continue rinsing until the water runs clear. This may take a while, especially if you have used a lot of red.
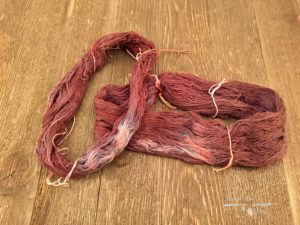
The thing that is difficult for me to accept is that the yarn decides what dye is excess dye, not me. I wish that lovely dark black cherry would all stay in the yarn. So far, I have not been able to get dark reds to stay in the yarn. On this last batch of dyeing, I did get some dark purples that kept more of the red than usual. (Most attempts at purple have resulted in periwinkle.)

Tips, cautions, and thoughts about results of Kool-Aid dyeing
- The number one caution I have is that I’m not convinced the color is stuck in this yarn. I haven’t worked with it yet, but I certainly am not using it to make something for a gift or to sell. How awful would it be to give a gift that not only runs, but ruins someone’s clothing too. Yikes. So I”ll keep playing around with techniques until I can say “here is how to do this with certainty.” Until then, try it out on yarn you’re experimenting with. Let me know what ended up working for you and what didn’t. I’d love it if we could nail down how to get silk Kool-Aid dyed successfully!
- I’m going to reiterate what I’ve said above about reds. Don’t get your hopes up that black cherry or tropical punch will turn your yarn a deep or bright red. Blues work great.
- I tried putting the yarn into jars full of Kool-Aid dye and leaving them for a day or two. Without heat, the dye pretty much all rinsed away. The water never ran clear. I used the microwave and the steaming step and was able to get the water to run clear eventually.
- Steaming without wrapping the yarn in plastic results in patches in the yarn where the dye has been removed by the hot water hitting the yarn.
- Putting your yarn in the dye bath loose without tying the hanks results in a giant mess of tangled yarn. I suppose you can dye it and rinse it that way and then have a fun time untangling it all, but wouldn’t you rather get to using it?
- You can get some nice effects with some effort and patience. I’ll let you know if this ends up all over my hands when I get to working with it.

I would love to read your experience with this in the comments. What have you done that has worked? What hasn’t worked? Should I just give up and use grown-up dyes?
I am also commenting to let you know of the helpful encounter my friend’s daughter found reading through your web page. She figured out numerous issues, not to mention what it’s like to have an amazing giving mood to have most people really easily know selected impossible subject areas. You really exceeded our own expectations. Many thanks for imparting the interesting, safe, explanatory and even easy thoughts on the topic to Janet.
Very quickly this website will be famous amid all blog users, due to it’s
pleasant posts
I am extremely impressed with your writing skills as well as with the layout on your blog.
Is this a paid theme or did you customize it yourself? Either way keep up the excellent quality writing, it’s rare to see a nice blog like this one today.