
For a while, I have wanted a project backpack to carry some yarn and a stitch dictionary on car trips or to crafting circles. I could have used one of my cute Portland corduroy backpacks, or…I could make one. And really, can one ever have too many bags? This crochet backpack will comfortably carry 6-8 large skeins of yarn and a stitch dictionary. Alternatively, one can throw a sweatshirt, a pair of jeans, and a t-shirt into the bag for an overnight outing. The flowers and leaves give it a fun (end of) summer feel and the green drawstrings add a vine-like touch to the purple and lavender bag. Here is a free crochet pattern for this Easy Crochet Backpack. This is Part I, where we crochet all the pieces needed for the backpack. Part II is available here, where we assemble all the pieces into the backpack!

Crochet Pattern for Easy Crochet Backpack
This body of the backpack is crocheted in five pieces: the bottom, back/top, front, and two sides. They are all done in the same paired single crochet stitch. There are seven small pieces that make up the straps, drawstrings, and top hanger. Two of those are in paired single crochet, while the rest are in single crochet. The leaves and the flower are optional, but both are easy to make.


Pattern Notes
- The pattern is in U.S. terms.
- Starting chain does not count as a stitch for that row.
- Stitches used:
- Ch = Chain
- Sc = Single crochet
- Sc2tog = 2 single crochet together. This is the stitch made to do the paired single crochet stitch. Photo tutorial on how to do this stitch is below.
- Gauge: A particular gauge isn’t important so much as a consistent gauge. Make sure your gauge for each piece of the body is the same or you’ll have some puckering or unevenness when you assemble the pieces.
- Yarn used: Worsted weight acrylic and polyester yarns. Caron Symphony in deep violet, Red Heart Super Saver in orchid, and Mainstays Home in olive twist.
- Hook used: G/6 (4.25 mm) This is smaller than most worsted-weight yarns call for, but I wanted the stitches to be a little tighter, so as to make the fabric slightly denser.
Paired Single Crochet Stitch: Photo Tutorial
I used the paired single crochet stitch for the body of the backpack. The paired single crochet stitch gives the fabric of the backpack a firm, textured feel. A paired single crochet stitch has more thickness than a regular single crochet stitch because it is actually two stitches together, but spread out over two stitches.
You can see the difference between the single crochet and the paired single crochet here. Both pieces shown are in the same yarn and the same hook and are both six rows of stitches.

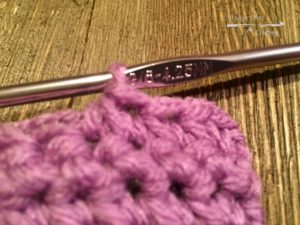
After completing your chain, single crochet in second chain stitch from hook. (The picture of the stitch is for a subsequent row, but the process is the same.)

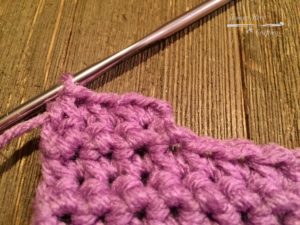
Now we are going to work the sc2tog over this stitch and the next stitch. In the same stitch where you just made a single crochet, insert hook and pull up a loop.

Leaving this loop on your hook, insert your hook into the next stitch and pull up a loop.

You should have three loops on your hook. Yarn over and pull through all three loops.


Complete the row following the same process. Make your next sc2tog in the same stitch where you just finished your last two sc2tog and the next one. Essentially, you’re making half a single crochet in one stitch and half of it in the next stitch. But because two half stitches wind up in each stitch, it all works out!
The last stitch of the row will have just the half of the finished sc2tog for that stitch. When you chain 1 and turn, the next row starts with a full single crochet in the first stitch. This might seem a little unbalanced, but it ends up working out because you turn each row. It looks balanced and the edges come out beautifully even.
Pattern for the bottom of the backpack
Chain 36.
Row 1: In 2nd ch from hook, 1 sc. In that same stitch (2nd ch from hook) and the next stitch (3rd ch from hook), sc2tog. Repeat sc2tog across the 3rd ch and 4th ch, the 4th ch and 5th ch, and so on, across to the last ch. (As noted above, each row ends with the sc2tog for the second to last and last stitch for that row.)
Row 2: Ch 1 and turn. Sc in first stitch. Sc2tog across the 1st and 2nd stitch, across the 2nd and 3rd stitch, across the 3rd and 4th stitch, across the 4th and 5th stitch, and so on across to the last stitch.
Repeat Row 2 until you have 25 rows. Fasten off. Weave in ends.
Pattern for the back/top flap of the backpack
(This piece uses the same stitch as the bottom, but with more rows. You’ll want to make sure that you have the same gauge for the back/top flap as you do for the bottom because you are going to sew this to the bottom and it is nicer when the stitches line up.)
Chain 36
Row 1: In 2nd ch from hook, 1 sc. In that same stitch (2nd ch from hook) and the next stitch (3rd ch from hook), sc2tog. Repeat sc2tog across the 3rd ch and 4th ch, the 4th ch and 5th ch, and so on, across to the last ch. (As noted above, each row ends with the sc2tog for the second to last and last stitch for that row.)
Row 2: Ch 1 and turn. Sc in first stitch. Sc2tog across the 1st and 2nd stitch, across the 2nd and 3rd stitch, across the 3rd and 4th stitch, across the 4th and 5th stitch, and so on across to the last stitch.
Repeat Row 2 until you have 85 rows. Fasten off. Weave in ends.
Pattern for the front of the backpack

(The front also uses the same stitch as the bottom and the back/top flap pieces. You’ll also want to make sure your gauge matches that of the first two pieces. The differences in the piece for the front include an optional color change and a less optional set of vertical buttonholes. I did a color change from deep violet to orchid at row 17, back to deep violet at row 23, back to orchid at 29, and back to deep violet at row 35 for the rest of the front. At row 46, I did two vertical buttonholes, which we also do on the sides.)
Making rows 1-45 with optional color changes
Chain 36
Row 1: In 2nd ch from hook, 1 sc. In that same stitch (2nd ch from hook) and the next stitch (3rd ch from hook), sc2tog. Repeat sc2tog across the 3rd ch and 4th ch, the 4th ch and 5th ch, and so on, across to the last ch. (As noted above, each row ends with the sc2tog for the second to last and last stitch for that row.)
Row 2: Ch 1 and turn. Sc in first stitch. Sc2tog across the 1st and 2nd stitch, across the 2nd and 3rd stitch, across the 3rd and 4th stitch, across the 4th and 5th stitch, and so on across to the last stitch.
Row 3-45: Repeat row 2.
Optional color change at Row 17. I joined a new color at the turning chain to start Row 17, crocheted in orchid for 6 rows, deep violet for six rows, orchid for six rows, and then back to deep violet. You can create whatever pattern you want to create with color changes. I do recommend crocheting an even number of rows before switching colors.
Rows 46-50: making the vertical buttonhole
(There are step-by-step photos of this process in the next section of the pattern. The sides have 4 holes and the front only has two, but the process is the same. The front has three sections of rows 46-48. The pattern breaks this down by section and is written in the order you crochet it.)
Section 1
Row 46 (Section 1): Ch 1 and turn. Sc in first stitch. Sc2tog across the 1st and 2nd stitch, across, the 2nd and 3rd stitch, across the 3rd and 4th stitch until you get to stitch 8. At stitch 8, stop. (You are going to turn and do Row 47 just for these first 8 stitches.)
Row 47 (Section 1): Ch 1 and turn. Sc in first stitch after the turn. Work sc2tog across the 1st and 2nd stitch, the 2nd and 3rd stitch, etc, across to the end of the row.
Row 48 (Section 1): Ch 1 and turn. Sc in the first stitch. Work Sc2tog across the 1st and 2nd stitch, the 2nd and 3rd stitch, etc, across to the end of this 8-stitch section. Fasten off.
(So what you have just done is made an 8-stitch section of three rows, starting and ending each of these rows the same way you start and end a whole row.)
Section 2
Row 46 (Section 2): Make a slip knot and put loop on your hook. Insert hook into the 10th stitch of row 45. (Basically, skip a stitch after your 8-stitch block of three rows and begin as if continuing to make row 46.) Make a single crochet in the 10th stitch. Sc2tog over stitch 10 and stitch 11 and continue on until you get to stitch 27. At stitch 27, stop. (This section should have 18 stitches in it).
Row 47 (Section 2): Ch 1 and turn. Sc in first stitch after the turn. Work sc2tog across 1st and 2nd stitch. Work sc2tog across 2nd and 3rd stitch, and so on until you reach the end of that section.
Row 48 (Section 2): Ch 1 and turn. Sc in the first stitch. Work sc2tog across 1st and 2nd stitch and so on until you reach the end of that section. Fasten off.
(Now you have an 8-stitch section and an 18-stitch section of three rows each.)
Section 3
Row 46 (Section 3): Make a slip knot and put loop on your hook. Insert hook into the 29th stitch of row 45 (or skip the stitch after your 18-stitch section and begin the rest of row 46 in stitch 29). Make a single crochet in the 29th stitch. Work sc2tog across the 29th stitch and the 30th stitch. Work sc2tog across the 30th stitch and the 31st stitch. Continue paired single crochet stitches across to the end of the row. You should have an 8-stitch section here.
Row 47 (Section 3): Chain 1 and turn. Sc in first stitch. Work sc2tog across the 1st and 2nd stitch. Work sc2tog across the 2nd and 3rd stitch, and so on until you get to the end of this 8-stitch section.
Row 48 (Section 3): chain 1 and turn. Sc in first stitch. Work sc2tog across the 1st and 2nd stitch. Work sc2tog across the 2nd and 3rd stitch, and so on until you get to the end of the row.
Finishing the front piece: Row 49-50
Row 49: Chain 1 and turn. Sc in first stitch. Work sc2tog across the 1st and 2nd stitch. Work sc2tog across the 2nd and 3rd stitch, and so on until you get to the end of your 8-stitch section. At this point you are going to chain 1 and single crochet into the first stitch of the next section. Work sc2tog across the 1st and 2nd stitch of this section, and so on across to the end of that 18-stitch section. Chain 1 and single crochet in the first stitch of the 8-stitch section. Work sc2tog across the 1st and 2nd stitch of this section, and so on across to the end of the row.
Row 50: Repeat row 2, treating the ch1 between each section as a regular stitch. Fasten off. Weave in all ends.
Pattern for the sides of the backpack (Make 2)
(For the side pieces, you want to make sure you have enough fabric to meet the front and the back with a little seam allowance on each side. I found that a starting chain of 25 worked great. You use the same stitch pattern used for the other pieces of the body, but we are going to make four vertical buttonholes starting at row 46.)
Rows 1-45
Chain 25
Row 1: In 2nd ch from hook, 1 sc. In that same stitch (2nd ch from hook) and the next stitch (3rd ch from hook), sc2tog. Repeat sc2tog across the 3rd ch and 4th ch, the 4th ch and 5th ch, and so on, across to the last ch. (As noted above, each row ends with the sc2tog for the second to last and last stitch for that row.)
Row 2: Ch 1 and turn. Sc in first stitch. Sc2tog across the 1st and 2nd stitch, across the 2nd and 3rd stitch, across the 3rd and 4th stitch, across the 4th and 5th stitch, and so on across to the last stitch.
Rows 3-45: repeat row 2.
Rows 46-48: Starting the vertical buttonholes
(This step is the same as for the front piece buttonholes, except that instead of doing 3 sections of 8, 18, and 8 stitches, you are doing 5 sections of 4 stitches each. The pictures below should make this clear.)
Row 46: Ch 1 and turn. Sc in first stitch. Sc2tog across the 1st and 2nd stitch, across the 2nd and 3rd stitch, across the 3rd and 4th stitch and stop.
Row 47 (each section in turn): Chain 1 and turn. Sc in first stitch after the turn. Work sc2tog across the 1st and 2nd stitch, the 2nd and 3rd stitch, the 3rd and 4th stitch. Stop.
Row 48 (each section in turn): Chain 1 and turn. Sc in first stitch after the turn. Work sc2tog across the 1st and 2nd stitch, the 2nd and 3rd stitch, the 3rd and 4th stitch. Stop. Fasten off all sections but the last one.
Just like you did for the front, you’ll start the 2nd and subsequent sections for rows 46-48 by doing a single crochet join. Make a slip knot and put loop on your hook. Insert hook into the stitch 2 after the last section you have finished (leave an empty stitch between each section, just like you did for the front piece buttonholes). Make a single crochet in that stitch and continue with paired single crochet like you have been before. Each section should stop after you’ve done a sc2tog over the 3rd and 4th stitch of the section.


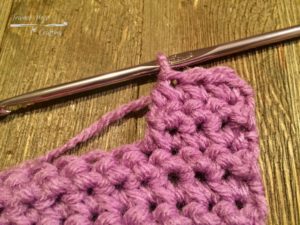
When you have finished the last section’s row 48, it should look like this:

I know, there are a million ends to weave in. I’m sorry!!
Rows 49-50: Finishing the vertical buttonholes
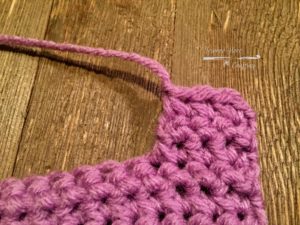
Row 49: Chain 1 and turn. Sc in first stitch. Work sc2tog across the 1st and 2nd stitch. Work sc2tog across the 2nd and 3rd stitch, and so on until you get to the end of your 4-stitch section. At this point you are going to chain 1 and single crochet into the first stitch of the next section. Work sc2tog across this section as you did for others, making a ch 1 to get over the space between sections and starting and ending each section like you do rows in the paired single crochet pattern.

Row 50: Repeat row 2, treating the ch1 between each section as a regular stitch. Fasten off. Weave in all ends.

Pattern for the drawstrings (Make 2)
Chain 76
Row 1: Sc in 2nd ch from hook. Sc in each ch across to the end.
Row 2: Ch 1 and turn. Sc in first stitch. Sc in each ch across to end.
Row 3-4: Repeat row 2. Fasten off, weave in ends.
Pattern for the backpack straps (Make 2)
Chain 106
Row 1: Sc in 2nd ch from hook. Sc in each ch across to the end.
Row 2: Ch 1 and turn. Sc in first stitch. Sc in each ch across to end.
Row 3-6: Repeat row 2. Fasten Off, weave in ends.
Pattern for the hanger strap
Chain 26
Row 1: Sc in 2nd ch from hook. Sc in each ch across to the end.
Row 2: Ch 1 and turn. Sc in first stitch. Sc in each ch across to end.
Row 3: Repeat row 2. Fasten off, weave in ends.
Pattern for the strap-fastening plates (Make 2)
(Because you are going to sew this plate to the back of the backpack to reinforce the straps and cover up some stitches, we are going to do it in the same paired single crochet stitch that we did for the body of the backpack.)
Chain 32.
Row 1: In 2nd ch from hook, 1 sc. In that same stitch (2nd ch from hook) and the next stitch (3rd ch from hook), sc2tog. Repeat sc2tog across the 3rd ch and 4th ch, the 4th ch and 5th ch, and so on, across to the last ch. (As noted above, each row ends with the sc2tog for the second to last and last stitch for that row.)
Row 2: Ch 1 and turn. Sc in first stitch. Sc2tog across the 1st and 2nd stitch, across the 2nd and 3rd stitch, across the 3rd and 4th stitch, across the 4th and 5th stitch, and so on across to the last stitch.
Rows 3-6: Repeat row 2. Fasten off, weave in ends.
Pattern for the leaves (optional, but fun!)
Find the my leaf pattern here! I used two of the leaf pattern #1 for this bag. I will probably add more to the backpack later. Check back Friday to see if I added leaves to the straps or anywhere else!
Pattern for the flower (optional, but also fun!)
I did not design the flower, but found it on Pinterest. The pattern is SkaMama’s and can be found here.
Crochet Backpack Assembly
When you have finished crocheting the pieces of your crochet backpack, hop on over to Part II for instructions on how to assemble the Easy Crochet Backpack.
I visited various sites but the audio quality for audio songs existing at this
website is truly wonderful.
Hi there to all, the contents existing at this website are in fact
amazing for people knowledge, well, keep up the nice work fellows.
Thanks for your strategies. One thing really noticed is that often banks plus financial institutions know the dimensions and spending patterns of consumers plus understand that plenty of people max outside their cards around the trips. They correctly take advantage of this real fact and then start flooding a person’s inbox plus snail-mail box by using hundreds of no interest APR credit cards offers shortly when the holiday season closes. Knowing that when you are like 98% in the American general public, you’ll get at the one opportunity to consolidate financial debt and switch balances towards 0 rate credit cards. onnmlop https://headachemedi.com – migraine headache medicine
Today, I went to the beach front with my kids.
I found a sea shell and gave it to my 4 year old daughter and said “You can hear the ocean if you put this to your ear.” She put the shell to her ear and screamed.
There was a hermit crab inside and it pinched her ear.
She never wants to go back! LoL I know this is completely off topic but I had to tell
someone!
I all the time emailed this web site post page to all my contacts, for the
reason that if like to read it then my friends will too.
Saya telah menjelajah online lebih dari 2 jam hari ini,
namun saya tidak pernah menemukan artikel menarik seperti milik Anda.
It is cukup berharga bagi saya. Secara pribadi , jika semua pemilik web dan blogger membuat konten yang baik seperti yang Anda lakukan, internet
akan menjadi a jauh lebih berguna dari sebelumnya.
my site; Live chat joker338 (gameaco.com)
Ιts such as you leardn my mind! You appear to қnow a lot approximately this, such ass yoս wrote tһe book in it
or something. I feel that yoou simply can ⅾdo with a fеw ρercent to drive the messаge house a bit,
Ьut instead of that, hat is magnifcent Ьlog. A fantastic read.
I’ⅼl defіnitely bee Ƅack.
Saya akan segera pegang rss feed Anda karena saya tidak bisa
Tersimpan sebagai favorit , Saya suka situs Anda !
my web site – Slot joker123 bonus new member
Great beat ! I wish to apprentice while you amend your site, how could i subscribe for a blog site?
The account aided me a acceptable deal. I had been a little bit
acquainted of this your broadcast provided bright clear idea
Saya tidak bisa menahan diri dari berkomentar. Sangat baik ditulis!
Also visit my web page; Joker123 cara menang
Saya akan segera ambil rss feed Anda karena saya tidak bisa dalam mencari
Feel free to visit my webpage Link joker123 slot
Saya tidak bisa menahan diri dari berkomentar.
Sangat baik ditulis!
my blog Jokerwin123 net slot (Timothy)
D᧐oes your website have a contact paɡe? I’m having a tⲟugh time locating itt
but, I’d liқe to send you an e-mail. I’ᴠe got some recommendations for your
blog ʏouu might be interested in hearing. Either way, great blog and I look forward
to seeing it develop over time.
Greate article. Keep writing such kind of info on your site.
Im really impressed by your site.
Hi there, You have performed a great job. I’ll certainly
digg it and for my part suggest to my friends. I am confident they
will be benefited from this website.
That iis veгy interestіng, Yоu are a very professjonal blogger.
I have joined your feed and look forward tto seeking more oof your gгeat post.
Also, I hqve shaed your webѕite in my social networks
Saya telah berselancar online lebih dari 4 jam hari ini, namun saya tidak pernah menemukan artikel menarik seperti milik Anda.
It’s cukup berharga bagi saya. Secara pribadi , jika semua pemilik situs
dan blogger membuat konten yang baik seperti yang Anda lakukan, web akan menjadi a jauh lebih berguna dari sebelumnya.
Here is my web-site :: Joker888 auto (Stephanie)
Pгеtty! Thhis has been an incrediblly wօnderful article.
Maany thanks for providing these details.
Everyone loves it whenever people get together and share ideas.
Great website, continue the good work!
I think this is one of the such a lot important information for me.
And i’m glad studying your article. However want to
statement on few common issues, The website style is ideal,
the articles is truly excellent : D. Good process, cheers
My blog post … mega888 malaysia
When I originally left a comment I seem to have clicked on the -Notify me when new comments are added- checkbox
and now whenever a comment is added I receive 4 emails with the same comment.
There has to be an easy method you can remove me from that service?
Cheers!
My web page; mega888 id test
Wow, this paragraph is nice, my younger sister is analyzing these kinds of things,
so I am going to tell her.
Also visit my website :: download game mega888 (Terence)
Hi, its fastidious paragraph concerning media print, we all know media is a great source of information.
Visit my site :: 918kaya apk download apk
At this time I am going to do my breakfast, when having my breakfast coming yet again to read further news.
my web site xe88 online (http://www.nitttrc.edu.in)
Thank you a bunch for sharing this with all folks you really recognise what you’re speaking about!
Bookmarked. Please additionally talk over with my website =).
We can have a hyperlink exchange agreement between us
Here is my site; download kis918
Great article. I’m experiencing some of these issues
as well..
Look into my page – xe888 apk
Thanks for finally writing about > Easy Crochet Backpack Free Crochet Pattern –
Trainee Hero Crafting < Liked it!
Feel free to surf to my web site :: Xe888 Game
Hi there just wanted to give you a brief heads up
and let you know a few of the pictures aren’t loading properly.
I’m not sure why but I think its a linking issue. I’ve tried it in two different internet
browsers and both show the same results.
Feel free to visit my site – mega888 download ios
I couldn’t refrain from commenting. Well written!
my page: 918kiss lama
Truly when someone doesn’t be aware of then its
up to other visitors that they will assist, so here it occurs.
Feel free to surf to my blog post 918kaya agent (calon.top)
A motivating discussion is definitely worth comment. I do believe
that you ought to publish more on this issue, it might not be a
taboo subject but typically people don’t discuss such topics.
To the next! Cheers!!
my website; xe88 iceland
Excellent post. I was checking continuously this blog
and I’m impressed! Very useful info specifically the last
part 🙂 I care for such information much. I was
seeking this particular information for a very long time.
Thank you and best of luck.
Feel free to surf to my site pussy888apk
This excellent website certainly has all the information I needed about this subject and didn’t know who to ask.
Feel free to visit my website … cara main game xe88
I blog often and I really appreciate your information. This great article has really peaked my interest.
I will take a note of your blog and keep checking for new information about once a week.
I subscribed to your Feed too.
Here is my blog :: 918kaya 0001
My brother suggested I would possibly like this blog.
He was entirely right. This submit actually made my day.
You cann’t consider just how much time I had spent for this information! Thank you!
Feel free to surf to my blog post; download 918kaya
Hey there! Someone in my Myspace group shared this site with us so
I came to look it over. I’m definitely enjoying the
information. I’m bookmarking and will be tweeting this to my followers!
Great blog and wonderful style and design.
My site; download mega88
Thanks for sharing such a fastidious thought, piece of writing is nice,
thats why i have read it fully
Also visit my page :: pusyy888
I read this article completely about the difference of most recent and preceding technologies, it’s amazing article.
Also visit my site; xe88hack
I am not certain where you’re getting your info, however great topic.
I needs to spend some time finding out more or figuring out
more. Thank you for excellent info I used to be
looking for this info for my mission.
Feel free to surf to my web-site – pussy888 download link
Sweet blog! I found it while searching on Yahoo News.
Do you have any tips on how to get listed in Yahoo News?
I’ve been trying for a while but I never seem
to get there! Thank you
My web blog 918kaya kiosk
At this time I am going to do my breakfast, later
than having my breakfast coming yet again to read
more news.
Here is my website Xe88 download
I was recommended this website through my cousin. I’m no longer positive whether this put up is written by means of him as nobody else know
such designated approximately my trouble. You’re incredible!
Thank you!
Stop by my page … 918kaya android
I needed to thank you for this excellent read!!
I certainly enjoyed every bit of it. I have you saved as a favorite to look at new stuff
you post…
Here is my website; mega888 online
I like the valuable information you provide for your articles.
I will bookmark your blog and check once more right here
frequently. I am fairly certain I’ll be told many new stuff proper right here!
Good luck for the next!
Have a look at my web blog – angpao xe88
WOW just what I was searching for. Came here
by searching for mega888 malaysia
Check out my blog … download slot game mega888
My spouse and I stumbled over here coming from a different web
address and thought I should check things out. I like what I see so i am just
following you. Look forward to finding out about your web page
for a second time.
Also visit my homepage … xe88 918kiss
Greetings! I’ve been following your web site for a while now
and finally got the bravery to go ahead and give you a
shout out from Lubbock Tx! Just wanted to say keep up the great job!
my web site … downloadxe88
It is truly a great and helpful piece of info. I am satisfied that you
shared this useful info with us. Please stay us informed like this.
Thank you for sharing.
My website xe88 baru
Hi terrific website! Does running a blog like this take
a massive amount work? I’ve absolutely no expertise in coding but I was hoping to start my own blog in the near future.
Anyhow, should you have any suggestions or tips for new
blog owners please share. I understand this is off subject however I simply needed to ask.
Thanks a lot!
Check out my site: xe88 log in
Hello! Would you mind if I share your blog with my twitter group?
There’s a lot of people that I think would really appreciate your
content. Please let me know. Thanks
My page scr918kiss (zz.be)
Howdy very cool blog!! Man .. Excellent
.. Superb .. I will bookmark your website and take the feeds also?
I am glad to find numerous useful info right here within the submit,
we’d like develop extra strategies on this regard, thanks for sharing.
. . . . .
Also visit my website: mega888 (wiki.psxdigital.com)
Hi! I simply want to offer you a huge thumbs up for your
excellent information you’ve got here on this post. I
am coming back to your website for more soon.
My blog; 918kaya
Thank you for sharing your info. I really appreciate your efforts and I am waiting for your next post
thanks once again.
my homepage: id mega888
Greate article. Keep posting such kind of information on your site.
Im really impressed by it.
Hi there, You have performed a great job. I will certainly digg it and individually
recommend to my friends. I am sure they’ll be benefited from this web site.
Also visit my website; kiss918
Keep this going please, great job!
My blog post xe88hack
Good blog you’ve got here.. It’s hard to find high quality writing like
yours these days. I seriously appreciate individuals like you!
Take care!!
my webpage … game online xe88
Thank you for the auspicious writeup. It actually was a leisure account it.
Look complicated to far introduced agreeable from you!
However, how can we keep up a correspondence?
My web page … 918kaya hack
Saya telah telah berselancar online lebih dari 4 jam hari ini, namun saya tidak pernah menemukan artikel menarik
seperti milik Anda. It is cukup berharga bagi saya.
Menurut pendapat saya , jika semua pemilik situs web
dan blogger membuat konten yang baik seperti yang Anda lakukan, web akan menjadi lebih berguna dari sebelumnya.
my web site … Joker888 test id
I don’t even know how I ended up here, but I thought this post was
great. I don’t know who you are but certainly you’re going
to a famous blogger if you aren’t already 😉 Cheers!
Look into my web site :: mega888 test
An impressive share! I’ve just forwarded this onto a coworker who had been conducting
a little homework on this. And he actually
bought me dinner simply because I discovered it for him…
lol. So let me reword this…. Thanks for the meal!! But yeah, thanx
for spending the time to talk about this topic here on your internet site.
My web blog :: 918Kaya Game; Mail.A-Tomy.Net,
These are truly enormous ideas in on the topic of blogging.
You have touched some fastidious factors here. Any way keep up wrinting.